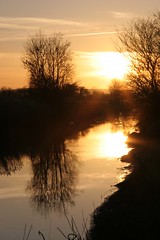
During the fruitful one hour before the sun goes down. See the accompanying article below.
Firefox

Tuesday
Photography With Natural Light
By Richard Haan
Being a good photographer, you will find that the weather can be to your advantage as well as a disadvantage. While it is impossible to control the weather, you may not have ideal conditions all the time for your shots, however you can make the most of what conditions you have. So no matter if it is sunny, rainy or even cloudy, you can still use the landscape to create beautiful shots.
There are really two ideal hours of the day that photographers just love to shot. The first of these two occurs right after sunrise and the other is, you guest it, just before sunset, and are generally longer during the summer and shorter during the winter. You may be wondering why these two hours are the ideal hours for shooting, during the early morning and late afternoon the sun is positioned for dramatic lighting, but will not create harsh shadows or blazes of light, especially when it comes to taking pictures of people.
There are three possible problems that can occur with shooting pictures of people in the late morning. The first, your subject is trying not to squint in the direct sunlight, this can cause a poor shots. Second, your subject can turn out to dark with them standing with the sun behind them this will cause a silhouette effect. Third, your subjects face and features can look distorted if they are standing with the sun at their side, which will create awkward shadows. These three possibilities can and will make for poor shots.
During the noon time hours, all the shadows will be disappear, which then will give your photos a flat appearance.
This is why shooting just after sunrise and just before sunset, will provide just the right kind of lighting and shadows, which in turn makes for a beautiful photographic opportunity because of the breath taking natural colors the sky has to offer.
Take advantage of cloudy or overcast days, for these will give you great shots as well.
More outdoor wedding pictures are taken on cloudy days, than bright sunny days. The reason being is the photographer is taking advantage of the earth's natural filter, the clouds. I am not referring to a heavy cloudy day, but rather a mild overcast day. The clouds will diffuse the bright light so that your subject is illuminated with natural filtered light, and the shadows are gone. You may still need a flash if the clouds are too heavy, but if this is the case than the possible solution is to also shoot in black and white.
Believe it or not you can still get great shots even on rainy days. The rain can add an interesting element to the image and you will still get a great shot. Extra care is needed on rainy days as not to let your equipment lay on the wet ground, and additional person will be needed on these days of shooting. The use of an umbrella and a water proof case will be very helpful as well. Thunder and lightning and rain make for great pictures, but caution is need when taking these shots as well.
So Use Nature To Your Advantage, and Happy Shooting.
My name is Richard Haan, I am the owner of http://www.rmhdigitalcameras.com
Article Source: http://EzineArticles.com/?expert=Richard_Haan
http://EzineArticles.com/?Photography-With-Natural-Light&id=1799915
Wednesday
Yellow Ladybird (Closer-up)
Super macro photo of Yellow Ladybird. See 5 tips on super macro photography.article.

Let us take it from the basics of what super macro photography is. Super macro is referred to the photographing of subjects at a ratio of more than 1:1. Normal macro is when we shoot at 1:1 magnification ratio, that is the 1mm of the subject is produced on the sensor as 1mm. Now super macro photography is when we represent 1mm on the subject as more than 1mm on the sensor.
What does super macro photography do?
The photographs become so detailed that you can compare them to looking at an object through a microscope. These photographs have vivid detail of the miniature world. Commercially they are required for text books journals etc. They are also used in advertisements and such promotional materials. Most importantly it allows the photographer to capture a world that is not seen with the naked eye.The image below shows a super macro of a leaf.
How is it done ?
There are mainly four ways that photographers achieve this type of photography.Super Macro Lens
The easiest and best results are go with using a Macro lens that provides more than 1:1 ratios, a good example would be Canon MP-E 65 mm f/2.8. This lens lets you take up to 5:1 macros. The above said lens is a manual focus lens and costs nearly 900$. More advance lens costs even more.Diopters on normal macro lens
Another easier method is to use diopters or closeup filters on 1:1 macro lens. This will let u go closer and thus obtain higher magnification. The results will not be as impressive but this is definitely cheaper than buying a lens. This option also reduces number of equipment needed to be carried. The magnification achieved is limited.Reversing
This is done by reversing ,preferably, a wide angle lens in front of a longer lens. This yields better results than diopters and comparable to dedicated lens but some times results in reduced functionalities like lack of auto focus and so on. This method can yield very high magnification. There will be problems of vignetting in some combinations.Bellows
This involves loading the lens on a below or using extension tube. Bellows allow variable adjustment but limits mobility. Bellows reduce the amount of light available as the length increases. This is a less preferred methods but some photographers working in studios prefer this method, as they can control the lighting and they don't need mobility.Now to the 5 tips:-
1. DOF:- Super macro means super importance to DOF, this means u will need to either make really tough decision on where to focus. The fact that most of these setups reduce total light will make it more difficult to working at higher f-stops. One method would be to take multiple images with varying areas in focus and combine them to get the desired image.2. Lighting:- Most of the above setups will reduce total light available thus, artificial lighting is very important in super macro photography. Use external flashes, it will be convenient to use a ring flash. If there is more light to work with the image can be captured much better. This means that investing in a good lighting device will be worth every penny.
3. Stability:- The high amounts of magnification means that you will need very high stability, this means you will need a very steady tripod for one. The setup is very sensitive due to the high magnification so you will benefit from using a remote release. Another feature you will benefit from would be live view to increase stability.
4. Subject:- Live insects will not make good subject for super macro simply because they keep moving. Good subjects would be dead insects and other such subjects that will not move. Flowers and their interiors make very interesting subjects too. Small stone , twigs etc also have a lot of story to tell. Remember that the possibilities in the miniature world is limitless there are so many things that we can capture, but as mention before lighting is very important.
5. Perspective:- As in any type of photography perspective is important in super macros also. The angle the framing everything counts. When working at high magnification it can be a very precise maneuver that sets it right or makes it all wrong.
The possibilities are limitless so keep in mind these tips and start experimenting.
Some samples of what can be done : -
http://www.randomequations.com/2008/11/15/5-tips-when-making-a-super-macro-photography-setup/
Shereena Vysakh is a Pro Photography Hobbiest Blogging at RandomEquationsArticle Source: http://EzineArticles.com/?expert=Shereena_Vysakh
http://EzineArticles.com/?5-Tips-For-Super-Macro-Photography&id=1695326
Tuesday
Vacation Photography - Shoot With a Still Camera Or Video
By Thomas F Jackson
You have worked hard all year, and now it is time to take a vacation and recuperate. This is a time that many people look forward to and prepare for most of the year. It is a lot of work to prepare for properly, plane tickets, hotel accommodations, car rentals, clothes to pack, pets to take care of, making sure the other family members and friends can contact you in an emergency, etc. But one of the items sometimes left to last, is photography equipment to record your vacation. Do you want to take along a lot of equipment, still cameras and lenses, accessories, plus the video camera to record all the action on your trip?
When taking a vacation, most people will take a still digital camera or a video camera. Some will take both, and do their best to contend with the hassle of switching between cameras.
Some scenes are better suited to being photographed with a video camera, obviously as with things that are moving, ,such as a parade or at the races, while others are better suited to a still camera, such as landscapes and cityscapes.
You need to think a little differently in order to take advantage of each camera systems features. Video experts and movie makers alike, will tell you that the best way to create an interesting video is to shoot a series of short clips, not one long boring continuous video. Video needs to be interesting, and we humans get bored very quickly, so make your videos short and to the point.
When you take photos with a digital still camera, you usually have a little time time to ensure you have the composition and lighting you want to create a stunning photo. Digital still cameras also offer a much higher resolution so you can make enlargements that you can hang on the wall for all to see. The digital DSLR is a very versatile system.
If you are not fully aware of the benefits of a DSLR let me do a quick summary. The first, and some believe the most important feature, is that you look through the viewfinder and you see exactly what the camera sees. In other words, the light from the subject enters the lens of the camera, and this is the image you see. At the instant you press the shutter release to take the photos, the camera re-directs the light onto the digital sensor to take the photo.
In normal daylight, this happens so quickly, it is barely noticeable. In dim light conditions, you will not be able to see through the camera until the exposure is finished. With the new generation of cameras, they employ a system called live view, where the image you are photographing is shown on the rear LCD screen. So you can compose and see the image as you take the photo.
Now, in the old days, and I am talking about a few months ago (things happen so fast in this digital age), you had to compromise on taking a video or a still camera or both on your vacation. But today, you have a new choice. The camera makers are now giving us, the photographers, thge benefit of being able to take awesome still and video images, all in one camera body.
Now you can take high resolution still photos, and HD quality video with sound, on the newest range of DSLR cameras. This is exciting news, as now you really do have the best of both worlds, a HD video camera and a high resolution digital still camera, all in one unit.
The DSLR now offers the photographer the benefit of HD video for awesome quality videos, but also the advantage of using the DSLR lenses to shoot those videos. All those optional lenses will enable you to take some amazing videos, and by adding filters and other accessories, this opens up a whole new genre of available effects.
With the advent of GPS tagging of your images, you will always have the exact location and time you took each image. This technology will tag every picture you take with GPS data so that you will always know exactly where you were when you took each photo. With some kinds of photography, such as bird photography, where you may have taken a photo of a particular bird, you will always be able to find your way back to the spot where you took the photo by referring to the GPS data.
Copyright (c) 2008 Tom Jackson
Like many professionals, Tom Jackson began his career by shooting weddings. Tom has been a consultant to the graphic design, advertising and publishing industries, teaching digital technology. You can get more info on photography and see [http://www.howtoshootweddings.net]examples of his work here; For free tips [http://learnweddingphotography.blogspot.com]visit Tom's blog. Article Source: EzineArticles.com
Saturday
 Tips to Enjoy Digital Photography in Ten Different Ways
By Claude Fullinfaw
After you have purchased your camera look at it as an asset. This small digital camera is going to be more than just taking snaps. You are going to be able to capture more images than before as you are free to take as many photos now and it won't cost you a single cent more. This is going to enable you to gather all your memories to share with your loved ones for years to come.
When you are ready to take a shot of an image you want to remember to always keep still with elbows close to you for stability, and refocus the lens by gently pressing down on the trigger halfway before you actually take a shot to be able to avoid the lag time caused by shutter error.
You can organize your photos into groups and this should become a habit early on in your digital photography hobby. By using the photo organizer and photo sharing software that came with your camera you can now literally take random photos and put them into groups to share with loved ones at a later date.
Arrange to have your pictures in a file sharing software program so that it's easily accessed by others at a later date. Make sure you have password security enabled the service to protect your photos. You don't want anyone and everyone viewing them.
It is important to transfer all your photos immediate off the camera onto your pc or photo sharing service to prevent images lost due to malfunctioning of your camera if it does happen. Sometimes your camera could be lost on a holiday and you could loss all your precious memories too.
Unwanted photographs should be deleted off the camera. If you are photo sharing on a service it is important to delete bad snaps as this could eat into your hosting bandwidth and reduce your storage capacity.
While it is such a good idea to share photos now via email, make sure you only send two or three each time with an email. If this is a problem you can opt for a photo sharing option on one of the many sites available on the net and simply direct your friends to your photos online. One such site is Flickr. This way all your photos are in one safe place and can be viewed almost instantly by family and friends when you allow them to. The old way of emailing photos is slowly dying.
You can print your photos off using your own home printer and some good digital photographic paper or just go online and choose from a number of printing services which will do the job for a very small fee. Snapfish is one such service on the net.
Have you thought of having your own blog? There maybe a few people who may not know what a blog is. It is simply your online diary on the net where you can keep notes of what you do and share photos or any thing that maybe of interest to your audience. A handy way to keep in touch if you are traveling.
Once you have organised your photos in a logical manner you will find it a pleasure to go back to them from time to time and enjoy the memories. Your family and friends are always going to praise you for this memory sharing gesture of yours.
Claude Fullinfaw is a successful publisher of digital photography tips for beginners at Digital-Photography-For-Beginners
Article Source: http://EzineArticles.com/?expert=Claude_Fullinfaw http://EzineArticles.com/?Tips-to-Enjoy-Digital-Photography-in-Ten-Different-Ways&id=934972
Friday
Rach in the rain
Somehow the bad weather adds atmosphere to the photo. The rain gives subtle hue to the picture. This goes to indicate that photos can be taken in all weather.

Thursday
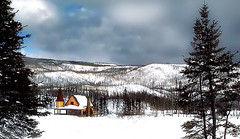
Landscape in Snow
Don't let the weather deter you from taking photographs. Shots in the snow can turn out fantastic.
The scene is "a picture painted by the sun without instruction in art." Snow or no snow, go out there and take the shots. With snow, so much the better.
The scene is "a picture painted by the sun without instruction in art." Snow or no snow, go out there and take the shots. With snow, so much the better.
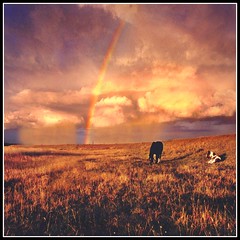
Landscape of Dreams
Digital photography at its best in bad weather, capturing a rainbow and golden hues of the fields.
The photographer got wet in the process but managed to get this wonderful shot. Worth it, don't you think?
The photographer got wet in the process but managed to get this wonderful shot. Worth it, don't you think?
 Photo: andrewlee1967
Digital Photography During Any Kind Of Weather
By Peter Cheongkh
If you are a photographer you know that bad weather does not have to stop you from going out and getting that fantastic digital photograph. This is your chance to get that kind of photograph that you can't just go out and take on any kind of day. These photographs can really show some crazy weather shots, like lightning storms, or just a dreary, rainy afternoon, and snow shots are very cool to see.
The harder it is for you to capture these kinds of photographs the more money someone would probably pay you for them. If you're an adventurous kind of photographer these kinds of shots will be just ideal for you. With safety in toe, take a calculated risk in order to create the perfect digital experience.
If you are taking digital photographs outside in the rain you will notice the way the rain tends to make everything around just shine. Whether your in the city or out in the country, looking across a field of grass or flowers, everything just seems to kind of sparkle. This can create a really nice photograph. Actually the rain, along with a few good size clouds can create just the perfect natural light setting, removing any fade outs or shadows that might appear in your digital photograph otherwise. With a little bit of rain you will have the chance to create some really great landscaping photographs or even of the wildlife that surrounds you, if you're in the right spot at the right time. Just make sure you have something to cover up your lens to keep the droplets away. You don't mind the rain but when it gets on your lens that could be a problem.
Taking a photograph of lightning can be complicated, you have to snap it at just the right time and that is very unpredictable. You will have to have a tripod for taking these kinds of photographs and a rather long shutter speed. You can hold down your shutter manually if you'd like so that all you have to do is shut it on your own as the lighting passes through the sky or slams down onto the grounds. You'll want this kind of photograph to be as bright as you can possibly get it, to get that full affect.
Snow photographs are a very appealing photograph to create. The light from the snow creates such a nice contrast along with all of it's surroundings. Capturing a photograph of the snow melting off the tree limbs or using the snow as a nice background for whatever your main object is that you are photographing. Some nice nature shots or friends and family playing in the snow, or you could even get a nice portrait type picture with snow all around.
You can do so many things when using digital photography, even things that may seem a little bit extreme. Making sure you have all the right gear and the drive to get out there and take risks is all you need, no matter what mother nature has in mind for that occasion.
Professional engineer in the IT industry engaged in marketing online, home based business.
Visit us at: http://www.emarkethall.com
Article Source: http://EzineArticles.com/?expert=Peter_Cheongkh http://EzineArticles.com/?Digital-Photography-During-Any-Kind-Of-Weather&id=897625
Friday
 Photo: nature55
5 Tips For Using Your Digital Camera
By B.L. Hill
You finally have that new digital camera and now you want to get busy taking great photos. Can you use a digital camera the same way you used your film camera? In most instances, yes you can but there are some areas that are different and require a change of mindset to get the most out of your digital camera.
Regardless of whether you have a regular or an SLR digital camera, you can follow the tips below to get you started experimenting with your new digital camera and making use of some of the differences between film and digital photography.
1. Take lots of pictures.
With film cameras you were always wondering if you have enough exposures left on the roll and if you had another roll of film. With the digital camera, you can take lots of pictures and then immediately edit them to remove the ones you don't want. If you didn't get the shot you want, you can probably try again. This is especially useful taking group shots - someone almost always has their eyes closed. The two things that determine the number of photos you can take before downloading are the resolution (quality) and the amount of memory in your camera. You can buy memory cards that will increase the number of photos your camera can hold.
2. Don't always use the highest resolution.
Although you can print great 8x10's from the highest resolution, it eats up memory thereby limiting the number of photos you can store in your camera. When you think about it, how often are you going to be printing 8x10's. The option is always there when you need it but I recommend the vast majority of photos be taken using medium resolution. When you are experimenting with your new camera, use the lowest resolution to allow you to take the most shots until you have learned what you can do with each option on the digital camera.
3. Use the fill flash mode.
This useful feature allows you to take better pictures in strong sunlight where dark shadows can ruin a great shot. It can also be used in shadow where it lightens the whole image without the washed out look full flash can give. This is not the regular flash setting, it is usually called 'fill flash' and is less intense than the regular flash.
4. Use a polarizing filter when photographing the great outdoor.
A polarizing filter gives you more contrast and richer, warmer tones when taking outdoor photographs. A polarizing filter can be rotated to give the desired effect. If you have polarized sunglasses, try holding the sunglasses in front of your face and look through one of the lenses. Rotate the sunglasses and notice the difference in the tones and contrast of your surroundings. This is what you can achieve with a polarizing filter. If you don't have a filter, you can use your polarized sunglasses - just hold one of the lenses as close as possible to your camera lens. Oh - make sure your sunglasses are clean!
5. Get up close.
When taking photos of people, don't be afraid to get in close. Head and shoulder shots usually capture your subject more completely that a shot that includes the entire body. If you can't physically get close enough, you can use the zoom on your camera. If you have the choice of optical or digital zoom, use the optical as it will result in a better shot.
So, get out there and try some of these tips and see what a difference they can make in the quality of your photos.
B.L. Hill has been taking photographs with a variety of cameras for over 40 years. Learn more digital photography secrets here.
Article Source: http://EzineArticles.com/?expert=B.L._Hill http://EzineArticles.com/?5-Tips-For-Using-Your-Digital-Camera&id=885862
Saturday
 Photo: imapix
By Diana Cooper
Ansel Adams, most widely known in the photography world for his immaculate and accurate view of nature, changed the way people looked at photography. Adams described himself in three ways: a photographer, lecturer, and writer. But in actuality, you can combine these three facets and call him a communicator.Born in 1902, Adams photographic vision was born immediately as he spent his childhood growing up in the natural beauty of San Francisco, California. As a shy and lonesome boy, Adams typically took long walks in the still-wild reaches of the Golden Gate observing and enjoying the nature.
Ansel Adams' true passion for nature photography came from the Yosemite Sierra, where he spent substantial time at from 1916 until his death in 1984. Starting with the Kodak No. 1 Box Brownie that his parents gave him, Adams hiked, climbed, and explored the beauty of nature.In 1930 Adams met photographer Paul Strand, whose images had a huge impact on Adams. It was his images that helped move Adams from a pictorial style in the 1920's to straight photography. Adams eventually would become straight photography's most articulate and masterful photographer.
What characterizes Adams' nature photography more than anything was his will to travel all around the country in pursuit of both the natural beauty he photographed and the audiences he required. People began to connect Ansel Adams' work with any topic of nature or the environment itself.While Ansel Adams is most known for his breathtaking nature photography, he also produced spectacular black and white photography. Adams made black and white photography what it is today through several pieces of work he created. His black and white images helped induce an emotion of timeliness and freeze a particular moment. While many believe color adds to a picture, Adams showed that a black and white image can say just as much, if not more, than that of a colored image.
One image that stands out that he created in 1938 was "Half Dome, Merced River, Winter", one of Adams' most beloved photographs of Yosemite Valley. He took the photograph with an 8"x10" view camera from the Old Sentinel Bridge near the Yosemite Chapel. This picture sums up his style perfectly with the gorgeous mountains covered in snow, trees all in front of the mountains also covered in snow, and a river flowing in the middle of the picture.There are few photographers that have been able to leave a lasting image on people like Ansel Adams. His love and desire for nature enable him to take breathtaking nature photographs. And his black and white photography has made it what it is today.
Nature and wildlife photography: http://www.dianasphotography.com andhttp://www.cafepress.com/dianasphotos
Article Source: http://EzineArticles.com/?expert=Diana_Cooperhttp://EzineArticles.com/?Ansel-Adams---Changing-Photography-Forever&id=870303
Monday
 Photo: krowster
Knowing what Digital Camera Accessories you Need
By Luvi Marie Corcuera
Living in today's high-tech world allows us to make use of the digital camera technology making it easier for us to shoot pictures on the go and be able to have them available in less time and with the use of digital camera accessories be able to improve or enhance the quality and experience of digital photography. The digital camera accessories available today as tools makes it better choice for us to invest in them especially if this becomes a hobby or a profession.
The Basic Necessities for Capturing the MomentIt doesn't really matter whether or not you do photography for profit or simply for leisure, it is probable that the next best equipment you need to invest in other than a nice new digital SLR camera are the digital camera accessories that you will use along with it. There are various types of digital camera accessories available that you may either need immediately or would need in the future which would help you with keeping your equipment in good shape, improve the quality of your photos, add additional capacity to your work output, reduce the complexities or simply just enhance your own photography experience. Some of the digital camera accessories may include any of the following and depending on your needs may even be further augmented as the need arises:
Camera BagsThe first probable investment being the camera bag, this is where you will place all the things that you will need when you are location shooting or traveling and it would also serve as your basic kit where all your photography equipment is stored and protected well. It is also one of the most inexpensive accessories that you may ever buy and add to this is that they enable you carry and protect the expensive equipment that you carry around. Camera bags come in many different shapes, sizes and colors through a wide variety of different brand names that specialize in this, and they are available for anyone's personal preference.
Camera TripodOf the camera accessories, perhaps the camera tripod is one that will help a lot of people since it helps reduce the amount of "camera shakes" when taking photos and allows you to take shots from a variety of angles. While does seem that this is a bulky and cumbersome accessory you should know that a great majority of tripods are either foldable or retractable and should be able to fit in most of the medium size to larger camera bags. If you happen to have one of the older tripods which you have used for your traditional cameras, then you should be ware that some of them are actually compatible with today's digital cameras and you may not need to re-invest in a new camera tripod. Just the ability to have steadier shot and a finer finished product is a must for many and this makes the camera tripod a great digital camera accessory to have and perhaps even a necessity for some.
Battery ChargersFor people who take vacations and for those that visit remote locations without the convenience or availability of digital camera accessories shops, the use of a battery charger is important. Even if you carry with you extra batteries sometimes these batteries just all of a sudden get drained and you are left with no power to your digital camera thereby rendering them useless. Having a battery charger is very handy in some situations and this may be the difference in being able to take that critical photo should the need arise. Being extremely affordable, it should be considered whenever deciding to but that those additional digital camera accessories on your next shopping spree.
Memory CardsThe memory card for a digital camera is perhaps the most important digital camera accessory for many as akin to a traditional camera that needs film, a digital camera needs memory for storage of images. Most people take this likely since the capacity of the memory cards they purchase with their digital camera is sometimes sufficient, it should however be known that some people do not delete or transfer the contents of the memory to other devices like PC's and in some cases the memory becomes full. Having that extra memory card with you will help reduce this from happening and will also be of great assistance during times when a large volume of photos need to be taken especially for professionals and for those that take a vacation in remote places where they are unable to transfer the images, and with no shops readily available in the vicinity.
You never know when your existing memory card will fail so keeping an extra card can pay dividends when the time comes. Just be aware though of what type of memory card your digital camera uses as there are various types of cards available for different digital cameras such as SD cards and Sony memory sticks. You don't want to buy a memory card that is not compatible to your digital camera.Other Important Accessories
Lastly, one of the digital camera accessories that you may want to have is the digital photo printer, which is especially useful if you want to print your photos from the comfort of your home. Most locals now have photo shops that can process the printing of your digital images but for some the ability be able to print from home or from anywhere, then a photo printer is a must. All you will really need is to have printing consumables always available, your personal choice of photo paper such as matte or gloss and you will be able to print off any photo you want, at the sizes and quality you need. Most of the printers in the market today are already of photo output quality and the choice these days is what size of footprint you want, depending on your needs i.e. if you travel a lot then perhaps a small size printer will be best for you.Conclusion
Whether you are a professional photographer or just enjoy taking pictures, you should be fully aware of the various digital camera accessories that are available in the market that can perhaps help you reduce the amount of effort in your profession or simply improve your photography experience. Some of these accessories can be expensive but a majority of them are indeed quite affordable and for many are in fact a necessity, and by being able to to have them can sometimes make the difference of being able to have that all important and perhaps even life changing moment captured. Availability for most of the accessories for your digital camera is in most cases excellent with a great number of electronic equipment shops in most locals and not to forget the growth of internet shops that specialize in providing thee services.As a final note, even if the requirement for digital camera accessories is not for you, then perhaps someone you know such as family and friends has these needs and this actually makes for great gifts on special occasions like birthdays. Anyone with a digital camera will be more than happy to receive these accessories as gifts and this should give you more options when giving away gifts this Christmas or any other occasion during the year.
Luvi Marie Corcuera is a full time Mom and works part time as the Editor of Informational sites such as: Acne Treatment and
Cake Decoration
http://EzineArticles.com/?Knowing-what-Digital-Camera-Accessories-you-Need&id=775651
Sunday
 Photo: May Ng
Organizing images or finding a particular photo can seem a daunting task. Having a digital photo management system in place for archiving and cataloguing your images will make the process much simpler.
Besides devising a consistent method for cataloguing your images, using a photo organizer or album software program will make managing your digital collection a breeze. While everyone has their own organizing method, here are some guides based on what works for me.
Archive OriginalsRight after downloading your photos, it's a good idea to burn them to CD or DVD. This prevents you from accidentally overwriting an original image. You can always go back to your disk to retrieve it. To save space you can keep adding new images until the disk is full. Be sure to label the CD with the year and note the contents whenever you add new pictures.
Delete Unnecessary PhotosAfter you've archived the original images to disk, review your downloaded images and purge unwanted shots. Delete badly exposed images, duplicates, out-of-focus shots, etc. If some are a little over or under exposed you can generally adjust them with your photo software, so unless you have a better version of an image, you may want to keep some of the so-so shots and fix them.
Name Your ImagesCreate a new subfolder to My Pictures whenever you download new photos. Don't just dump them all into My Pictures. There are several methods for naming and structuring your folders. I like to organize my folders chronologically and put all photos for a particular year into subfolders under that particular year. Other people like to group their pictures by topic, such as Vacations, School, Sports, Baby, Wedding, Family, etc.
When you download images, your software will prompt you for image names. Be sure to use relevant names, not the default "003784.jpg." For instance, if I download a series of Halloween photos, during the download process I will have my photo manager software rename all the images using "Halloween 2007" in the name. Later you can rename individual photos if you wish. For example, by adding "Lisa_Linda" within the file name you can later do a search to find all images of Lisa and Linda. To make it easier to find certain photos, you can rename individual images within your folders or use the Batch Process feature to rename a group of photos.Tag Images
To help you find photos of specific subjects, you can use your photo album software to tag images with keywords. They can have a variety of attributes such as date, place, occasion, and person. For instance, you could label a picture of your daughter Kathy at her 10th birthday party at the zoo using the keywords Kathy, 10, birthday, zoo and then be able to search for all images with these tags, no matter where they are on your hard drive. This is a huge timesaver in helping you find favorite pictures. Initially it can be quite time-consuming to tag photos, but most software will let you batch label a group of photos with the same keywords. This greatly speeds the process.It's also helpful to tag images that need editing like red eye reduction, cropping, color adjustments etc.
Protect Your Digital Photos and ProjectsCan you imagine losing that cool slideshow you made of your child's first birthday? Computer crashes can and will happen. Back up your photos! Burn them onto CD or DVD. It's easy, inexpensive insurance. Most PCs and laptops come with CD burning software. Or, if you have an external storage drive, use it to back up your images.
Finally, don't just let your precious picture sit on your computer. Print them, email them, frame them and enjoy them!For more information on organizing your digital photo albums, visit http://www.digitalphotos101.com
Article Source: http://EzineArticles.com/?expert=Valerie_Goettsch
http://EzineArticles.com/?How-to-Organize-Your-Digital-Photos&id=812999
Saturday
 Photo: Ceslavs
How to Take Better Night Photos
By Nellie Graham
Night photography is definitely one of the best types of photography you can delve into. It will allow you to capture different hues and colors during the night that would have been otherwise detected with the normal human eye. There will be things that will open up for you and you will be able to appreciate the presence of lights more often.
If you're having difficulty understanding metering, then you'll probably want to take up night photography as this is one of the types of photography where you don't have to worry about your metering. You can forget about honeycomb, matrix, spot and multi-metering systems as these will not be utilized in night photography.
The best metering system that you'll ever need for night photography is your eye coupled with some experience on your belt. Since we are no longer dealing with daylight, a metered reading is only as useful as a "starting point".
There are so few factors in night photography that can make the metering system unreliable. It is because whenever you read meter systems, they work on the premise that the area being read has equal amounts of light and dark areas. If you're metering with that premise then the system will not work 100%.
What you want to do is to simply start out with an aperture of 2 seconds with an aperture of around f/5.6 if your depth of field is not a priority. Should you need a longer exposure, just try the shutter. If your camera is able to go up to 30 seconds of open shutter time, you should remember to use the self-timer to fire the camera instead of pushing it down yourself.
This will eliminate any type of camera shake that will come out of pressing down on the shutter button and taking your hand off it to allow the mirror to capture light for 30 seconds. In cases like this, it is highly recommended to use some sort of cable release.
So whenever you are exposing a photograph during the night, you should always remember to use the Bulb setting if and when you have it, mount your camera on a sturdy tripod to minimize any type of camera shake and finally use a wired or remote trigger in order to take away any chances of you blurring the shot with the act of taking your finger away from the shutter button. Aside from these advices, you are on your way to capturing the best possible night shot.
Visit us to learn more about this topic http://www.guideto.com/night-photography/how-to-take-better-night-photos and http://www.photoscout.com
Article Source: http://EzineArticles.com/?expert=Nellie_Graham http://EzineArticles.com/?How-to-Take-Better-Night-Photos&id=829391
Friday
 Photo: Dany Ng
Take Control Of Your Photographs
By Diana Cooper
Before investing in a camera, consider choosing one that offers manual features in which you can control the outcome of your pictures. The two basic features are aperture and shutter speed. Just by understanding how they work you can turn your photographs into a piece of art.
First let me explain depth of field (DOF). DOF is the distance from the foreground to the background of the picture that is in sharp focus. An increase DOF makes wonderful landscape pictures such as a view of a valley where everything is in sharp focus including the flowers nearby, the mountains in the distance and all of nature's beauty in between. A decreased DOF works well when you want to blur the clutter in the background so the subject will stand out clearly.
One way to choose your DOF is by adjusting the aperture. Aperture is the diameter of an opening in the camera which exposes the lens and allows light to enter. The smaller the aperture (for example, f/22), the greater DOF you will have leaving you with a sharp picture. Your DOF is less when the opening is larger (for example, f/2) thus giving you a blurred background.
Lens focal length and the distance of your subject you will focus on are a couple of other ways to control DOF. Using a wide lens will increase your DOF and using a telephoto lens will decrease your DOF. Focusing on your subject in a far distance will have a greater DOF than focusing on your subject in a close distance.
Shutter speed is another way you can make a difference with your pictures. You can capture action by either creating a blurred motion by using a slow shutter speed (for example, 1/15) which makes wonderful waterfall pictures or you can use a fast shutter speed (for example, 1/1000) and freeze the movement which can make a great shot of a gymnast in mid air as she flips over the bar.
A fun way to use a slow shutter speed is to pan your shot. Say you are taking a picture of a bicyclist passing by. Focus in on the bike and follow it with your camera as the shutter stays open. This way, the cyclist will be fairly sharp and the background will give the impression of him/her moving really fast.
Aperture and shutter speed work together when it comes to the amount of light that enters. A small aperture (opening) allows very little light to enter so you will need a slow shutter speed. With a large opening, less light is needed so you will use a faster shutter speed. When using a slow shutter speed be sure to stabilize your camera to prevent shaking which will give you a blurred background and a blurred subject. A tripod works nicely.
It may sound a little confusing at first but it really is easy once you get the hang of it. You will be amazed by how much better your photos will look by taking control of these features instead of depending on a point and shoot camera. Best of luck!
About the Author: Diana Cooper specializes in nature and wildlife photography. You can visit her website http://www.dianasphotography.com to read more photography tips and articles, to buy her earth friendly greeting cards and to visit her photo and gift shops.
Article Source: http://EzineArticles.com/?expert=Diana_Cooper http://EzineArticles.com/?Take-Control-Of-Your-Photographs&id=807356
Tuesday
 Photo: KIRA.gmch634
Digital Camera - Mode Setting Control
By John Steele
Most digital cameras today have a mode setting knob. It's probably the most important control on your camera. The nice thing about the mode setting knob is that you can set it on full automatic and forget it. When the camera is in full automatic it does four things for you; it will:
1. Focus the Lens
2. Set the Aperture (size of the lens opening)
3. Meter the Light and Distance
4. Set the Shutter Speed
All you need to do is snap the picture and you will get a decent exposure. But if we take a closer look at the mode setting knob we'll see it has other features as well. The typical digital camera will have the following settings on its mode knob.
Landscape: The landscape icon usually looks like a mountain with a cloud over it. This setting presets the camera with a small aperture and helps keep your image in focus. It also sets the shutter speed fast enough to eliminate a blurred image. This setting can also be used for night landscapes, though it is not the preferred method. As you become more proficient with your camera you will learn ways to customize the settings to get better low light photos.
Sports Setting: This icon typically looks like a figure running. It locks in a faster shutter speed to freeze the subject and background. The camera will use the center of the viewfinder for focusing.
Portraits: This icon is easy to find it usually looks like a persons profile. This setting opens the aperture for a shorter depth of field. It keeps your subject in focus, but blurs the background for a more pleasing composition.
Night Portraits: In this zone the icon usually has a star or moon in it. When shooting in this mode the flash mechanism fires to fill the background and correctly illuminate the subject. The night setting can be used when shooting in very low light conditions.
Close-up: The close-up icon often looks like a flower, usually a tulip. This setting is used when you want to take pictures with great detail like plants or insects. This area of photography is often called macro-photography and is an art form in itself.
Think of the different basic zone modes as tools to be used in different picture taking situations as they arise. You will get average pictures with the automatic settings. Some of them will be quite good. But the better cameras contain advanced settings sometimes referred to as Creative Zone Settings. These controls give you much more creativity in the pictures you take, and can be used to provide greater adaptability as changing circumstances arise. http://www.digital-id.info/
Article Source: http://EzineArticles.com/?expert=John_Steele http://EzineArticles.com/?Digital-Camera---Mode-Setting-Control&id=785971
Saturday
 Photo: abdhakamabdah
Depth of field (DOF) is probably a term you have heard used in photography often enough, but what does it really mean, and how can you use it to make your digital pictures better?
The term depth of field refers to how much of your picture is in sharp focus. For example, in portrait shots you will notice that the background is often blurred and soft looking, while the subject is clear and sharp. Pictures like this have a shallow depth of field.
You have probably also noticed that in landscape shots everything in the picture is often sharp and clear, all the way from the dead tree in the foreground to the mountains off in the distance. Pictures like this have a deep depth of field.There are two main things that affect depth of field:
1.) The aperture (or F stop) setting--this refers to how wide the shutter opens.2.) The focal length of the lens--this refers to how much the lens “zooms in” your subject.
First we’ll take a look at the aperture settings. Most digital cameras have an aperture range of about F2.8 to F8, and this range usually compresses to about F4.5 to F8 when using full zoom. These aperture ranges vary somewhat from camera to camera, but we will use F2.8 to F8, with a full zoom range of F4.5 to F8, as our example.At the lowest setting (F2.8), the object you focus on will be sharp, but objects in the background will appear softer and out of focus. At the highest setting (F8), everything from the foreground of your picture to the objects off in the distance will appear sharp and in focus.
Now the focal length--we’ll use a digital camera with a 4 times zoom (35mm to 140mm focal length) as our example. At the 35mm end of your zoom range (no zoom), pretty much everything in your pictures will appear in focus. However, at the 140mm end of your zoom range (full zoom), only the object you focus on will appear sharp.So how does all this translate into making better pictures with your digital camera? Well, it’s like this:
Set your camera to “aperture priority”. Your camera’s manual will have simple directions on how to do this (it’s quite often just a matter of turning the dial on top). Once you have your camera on “aperture priority”, you will be able to select the aperture setting that you want, and the camera automatically chooses the correct shutter speed.If you want to take a picture where only your subject is in focus (like a portrait for example), first, zoom in rather than get close, and second, choose an aperture setting with the lowest number possible, in this case F4.5.
If you want to take a picture where the whole scene is in focus (like a landscape for example), first, zoom in very little or not at all, and second, choose an aperture setting at or near the highest number possible, in this case F8.So, don’t be shy, take your camera off of “auto” and try the “aperture priority” setting--you’ll be glad you did.
For more digital photography tips, high quality prints, free wallpaper, and eBooks, visit my web site: http://www.jeffgalbraithphotography.caArticle Source: http://EzineArticles.com/?expert=Jeff_Galbraith
http://EzineArticles.com/?Improve-Your-Digital-Photography-Using-Depth-of-Field-(DOF)&id=462847
Understanding Digital Camera Zoom Lenses
By Michael HuddlestonThere are two types of zooms used with digital cameras: optical and digital.
Optical Zoom
An optical zoom changes magnification by moving glass in the lens, changing the image falling on the sensor. Using an optical zoom maintains picture quality.
Zoom Ranges and 35mm Equivalents
Optical zoom lenses usually have a specification called “equivalent in 35mm.” This tells you the zoom range of the digital camera compared to a 35mm film camera. Typical 35mm equivalent zoom ranges you will see listed are 35mm-70mm or 35mm-105mm.
For example:
Wide-angle means a lens takes in more than normal viewing perspective. Telephoto lenses magnify the subject, bring it closer. Using these numbers as a guide, you can get an idea of the range of zoom lenses and what they will do for you.
28mm…..wide angle
35mm……slight wide angle
50mm…..normal perspective
70mm…..slight telephoto
105mm…..moderate telephoto
135mm…..strong telephoto
200mm+…..extreme telephoto So, a 35mm-105mm equivalent zoom lens changes from a slight wide angle to a moderate telephoto. A 28mm-200mm equivalent lens changes from a wide angle to an extreme telephoto.
A 35mm-105mm equivalent zoom is adequate for most users. If you plan on doing landscapes or picture taking in small, confined areas, consider a camera that can zoom to a 28mm equivalent.
Optical Zoom as 2x, 3x, 5x…
Taking the 35mm-105mm example above, we divide 105 by 35 to get a 3x zoom. A 28mm-105mm would be approximately a 4x zoom, and a 35mm-350mm would be a 10x zoom.
Digital Zoom
A digital zoom does not change, magnification. It simply crops the image on the sensor to magnify the image. Because less sensor is used, you use fewer pixels. This decreases picture quality. When comparing cameras, always use the optical number as this is much more important. You can get the same effect as a digital zoom by using software to crop the photos.
Note About Digital Zoom
As digital cameras become more sophisticated and powerful they are becoming capable of delivering “optical tricks” that render pictures that are remarkably stable and good looking. Only recently, cameras “digital zooms” are getting much better. Like all things though some companies are better than others. Do your research.
Article Source: http://EzineArticles.com/?expert=Michael_Huddleston
Subscribe to:
Posts (Atom)
Earn $$ with WidgetBucks


